This page = Not Ready for Prime Time
This is a set of notes I made to myself a few years ago when I simply wanted to see how IIS (and, ultimately, Exchange) worked, or, did not work. Prior to this experiment I’d always used Linux as a server. When I wrote this page I knew absolutely nothing about either Server 2003 nor IIS and I still know damned near nothing about MS servers. I still use Linux as a server. I’ve left this page here for my own use/entertainment. It’s kind of a jumbled mess and some of the instructions may be incomplete or completely wrong. If you’ve stumbled across it: I wouldn’t recommend this page as a guide for anyone else. This is here in case I’m bored and want to tinker…. There ya’ go.
How To Install Worpress on IIS
Download Some Files
The following files can be used to complete the guide on this page. Either version of MySQL is fine. The “pre-configured” php package has a php.ini file that already contains common edits. The “test pages” are .asp, .aspx, and .php pages which you can use to make certain your server is correctly parsing various file types.
Some helpful batch files
MySQL 5.1.53
MySQL 5.5.15
PHP 5.2.5
Pre-configured PHP
PHPMyadmin (1)
PHPMyadmin (2)
Test Pages – .asp, .aspx, & .php
NOTE: For some reason I had two versions of PHPMyadmin saved and I do not recall why….therefore the two downloads, above.
General Steps for Server installing Server 2003 & IIS 6
- Install Server 2003
- Uninstall “Internet Explorer Enhanced Security Configuration” through the “Add/Remove Programs > Add/Remove Windows Components” GUI. This isn’t mandatory and has virtually nothing to do with IIS, but, it’s a worthless component that will drive you insane….. Just a little reminder to myself.
- Set a static IP.
- Do updates – one will fail (see next point)
- Security Update KB2686509 will fail, repeatedly. In my case, the fix was to
copy two files (kbdusl.dll and kbdusr.dll) to system32 and/or C:\WINDOWS. After these files are copied, the update will work. You can download these files here - RECOMMENDED: I would suggest installing VirtualCloneDrive so as to
make installing components faster and easier….. - Registry edit to curb service failed to start notice: I will actually add this information later – but you need to add a new DWORD value called “Headless”, and, with a value of “1”. Update: You can download the registry entry, here.
- Install Domain Controller/Active Directory – this will be needed for MS Exchange and I prefer to install it before installing IIS 6.
- Go to Manage Server > Add A Role. Choose to add the Application server role (see graphic, below). This adds IIS 6 and allows you to include things like asp.net and Frontpage extensions. I simply say “yes” to everything and the entire thing is brain dead. You’ll need your Server 2003 CD in your drive to perform this installation (and others). When the installation is done you can open “localhost” in your browser to see the defult “Under Construction” page.
- You’ll want to open the IIS Server Manager and change the name of the default website to an actual domain name. Just right-click on the site, in the server manager, and choose the “Web Site” tab, then the Advanced option (see below):
Now, after using the “ADD” button and doing some editing, you should have something like this:
- At some point, you need to go to the C:\Inetpub\wwwroot folder and grant loose permissions to the IUSR_DELL user and, possibly, the IWAM_DELL user. However, I used to go to the advanced security settings and allow the permissions to propogate to all child objects. I found that this wreaked havoc on Exchange files and folders (breaking OWA). You actually should only need to make certain that the IUSR has full control of the wwwroot folder (based on my latest tests).Also, the suffix on the usernames will obviously vary depending on your installation media and/or hardware. In other words, IUSR and IWAM will end with something other than “Dell”. You’ll also probably want to grant these same users read/write permissions on C:WINDOWS\Temp – this is mandatory for WordPress installations.
WARNING: regarding permissions – In my limited experience I found the following:
- You need to grant full control on the wwwroot folder to the IUSR
- Do not allow permissions to propagate to sub-folders
- If you allow these new permissions to propagate to your Exchange folder, OWA will be buggered (assuming your going to install Exchange).
I would recommend that you not fiddle, extensively, with permissions on your default web site. Grant full control on the wwwroot folder to the IUSR and, unless otherwise needed, leave permissions alone.
Install PHP and Mysql
- MySQL is a simple binary which installs just like any other Windows application. I’m not going to get into the various options – it’s extremely straightforward. Just choose a “Standard” installation as opposed to the default “detailed installation” and follow the prompts. That’s it.
- PHP is, again, ridiculously simple. Just go to the PHP folder in this package and copy the directories and files as indicated.
For managing MySQL I’ve included an older version of Phpmyadmin with the downloads at the top of this page. You can copy the folder to IIS, not do any fiddling (permissions, etc.), and it works. You can configure it to your liking. RANDOM NOTE: I do not recall why I did this, but, horsing around I recently set my PHP upload limit to 3000M in php.ini. Note that setting a limit too high, like this, breaks phpmyadmin.
Configure IIS 6 to load PHP
This involves a number of steps, none of which are difficult.
- First, open the Server Manager and right-click on “Web Server Extensions”. Add an extension called “PHP” and, then, click “Add”. Having
clicked “Add” you will be able to browse for a file to load. Choose php5isapi.dll located at C:\php\php5isapi.dll.
- Now, in the IIS Server Manager right-click on your web site and choose Properties.
Open the following: Home Directory (tab) > Configuration > Add and do as illustrated below:
- Still in the IIS Server Manager, right-click on your web site and – again – choose Properties. Choose the “Documents” tab and “Add”. This is very self-explanatory. Just add “index.php” as a default content page. You may wish to move index.php to the top of the default document hierarchy (you’ll see the button).
- You’re done. Now, if you restart IIS you should be able to load php pages. A good way to test everything is to create a php.info page with the following syntax, calling it in your browser (you can save the file with any name):
Random Note: Creating Shared Folders
If you want to share a folder in the style of Windows XP, you’ll need to remember these steps. Since I’m just tinkering and security is not a real concern I want to be able to copy files to Server 2003 from other computers easily. You need to go to “Manage > Users and Groups” and untick the box that says “Disable this account”. There will be a red check on the Guest account and it will be disabled, by default. Then, just create a shared folder and grant liberal permissions to the “Guest” user – you can always change this, of course…..
WordPress, adding mime types, etc.
Installing WordPress can something of a headache, particularly when installing it on the default domain with Exchange – you have to be very careful about
how this is done. I just spent about four days trying to get this to work, and these are the things I recall:
- Install and enable PHP and MySQL for the server
- On the default domain, having already changed the header name(s), add PHP and the PHP document. IMPORTANT: If I recall correctly, when making these
changes various dialog boxes will appear that allow you to make certain changes to the Exchange files. Do not highlight any Exchange files nor
folders whenever you see these options – simply hit “Okay” (or something like that). I actually do not understand what selecting these
changes does – but I know OWA will not work if these are changed. - Extract WordPress to the wwwroot folder. When I just did this, the IUSR already had the required permissions on the folders. I did not have to jerk with the permissions on
the individual files and folders. - Give the IUSR complete control of the wwwroot folder. Don’t fiddle with advanced permissions (don’t allow this change to be inherited
by child nodes, or, whatever the hell it’s called). - Give the IUSR and IWAM users complete control of C:\WINDOWS\temp (otherwise, you can’t update nor install anything).
The flowplayer failed to find curl, recently, and I found the following fix. This seems a bit extreme, but it works and it breaks nothing. I copied virtually all of the files in the primary PHP folder and the C:\php\ext folder to C:\WINDOWS and C:\WINDOWS\system32. Obviously, this is overkill (and a little crazy) but it breaks nothing. A lot of php files need to be copied to these two places and I finally got tired of jerking around with this installation. I would recommend doing this simply (1) to make certain that everything works, and, (2) to get things done quickly. If you want to fiddle around, you can test things to see what works with a minimum of files copied to these two locations…….
ADD MIME TYPES
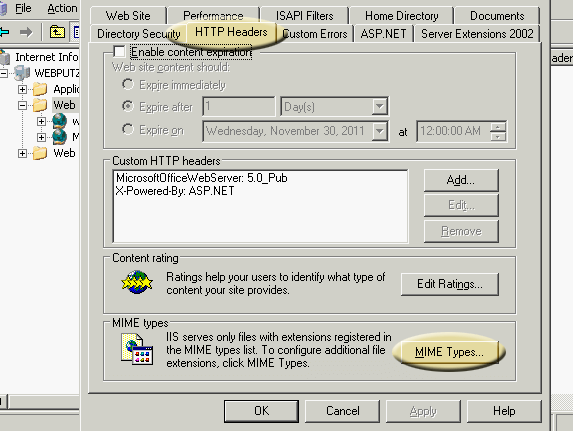
UPDATE: To add a mime-type, server-wide, right-click on the server in the IIS Manager and go to Properties > Mime Types (a button). If you add them on a per-site basis you right-click on the site, choose Properties > HTTP Headers (a tab) and you’ll see the MIME TYPES button. The point is: they can be added server-wide, or, on individual sites. bit weird: I think that I had to add a mime type for .png images (it did not exist by default) – and I added one for mp4 video that worked…like so:
mp4 video/mpeg
png image/png
And, for one reason or another I keep forgetting where the hell this GUI/button thing resides…. I’m still fumbling – oddly, I suppose – with the simplistic, point-and-click nature of a Windows server! By the way, here’s the code which worked for me to get .flv files to play:
flv-application/octet-stream
And here’s the damned thing I can never recall…. Open the IIS Manager and right click on your web site. Choose Properties > HTTP Headers (the tab) > MIME TYPES (a box near the bottom). A box will pop up and you enter the extension (eg. flv) and the sort of code I’ve mentioned above. Here’s a pic:
An Even Older, More Useless Set of Notes
Basic install + Active Directory
- Perform the OS installation, get drivers loaded etc.
- Set a static IP address manually.
- You’ll need the Server 2003 CD in the optical drive, or mounted, to proceed. Go to Server Manager and choose to add the Active Directory role. The routine will offer to set up your first active directory using various default values – at this embryonic point (for me), this option is fine. Choose a domain name which you own, and, which makes sense as a name for your local host. As I recall the computer reboots to finish this up.
NOTE ON ALLOWING AN XP-STYLE SHARED FOLDER: This isn’t something a lot of sysadmins wish to do, but for tinkering, I want to be able to copy files to Server 2003 from other computers. You need to go to “Manage > Users and Groups” and untick the box that says “Disable this account”. There will be a red check on the Guest account and it will be disabled, by default. Then, just create a shared folder and grant liberal permissions to the “Guest” user – you can always change this, of course…..
This presumes you’ve just installed Windows Server 2003 on your computer…
- Set a static IP manually – if you don’t, when you add the Active Directory role your box will be assigned a static IP on a weird subnet.
- Go to Server Manager and choose to add a role. By the way, you’ll need the installation CD in your disc drive for things like this…. Anyway, it will ask you if you want to add a “typical” first server role – the Active Directory. Say yes and just follow the prompts.
- This install will ask you for a domain name and, obviously, you need to pick something which makes sense…..(eg. “smallbusiness.local”, “netkwik.com” – whatever).
- When you’ve done the above, go to Server Manager and choose to add the Application Server role which, basically, is IIS and some associated things (ASP net, etc.).
- Now – to prepare for installing Exchange – go to Add/Remove Programs and go to the Windows Components area. Find Application Server and expand it; go to IIS and expand that; now enable SMTP and NNTP.
- I tinker a lot and I have been running the IIS default website on port 81. DO NOT put the default website on port 81 while installing Exchange. It may not hurt anything but I think it’s best left on port 8o until Exchange is installed.
- I would add a user if, for no other reason, to see what optins are available. Users are managed via the Active Directory Users and Groups menu (assuming you’ve installed the Active Directory).NOTE: Windows servers have requirements for user passwords which are different than Unix (which allows for any password you choose – for example, “pass”). You can’t do that on Windows. A password must contain a combination of upper and lower case characters and – I think – one or more numerals (I’ll check and update this thing). For instance, you need to use something like: headWAY721. Don’t worry, if you enter a password that doesn’t meet the requirements – of course – it will tell you…..
Be aware that you have to give the following two users significantly loose permissions in order to install things like Joomla, Drupal, WordPress, etc.:
IWAM_user-yourcomputername
IUSR_user-yourcomputername
As far as letting people just see these things, after they’re installed, I will need to tinker some more.
To start, stop, or restart the entire server, from a command prompt do the following:
iisreset /start
iisreset /stop
iisreset /restart
Changing ports – as simple as point and click…
One pretty cool feature of IIS 6 is that you can run the damned thing and have sites on all sorts of ports… For instance – if I left this thing running:
http://www.netkwik.com:81/
http://www.netkwik.com:82/
Drivers for Server 2003 on an HP dc7800
Installing the Drivers
So, here’s the drill (once you’ve downloaded the .zip archive)
- The chipset driver is point, double-click, and install….
- The ethernet driver, with this download, requires a manual install from the Device Manager
- The graphics driver must be run in XP Compatability mode
- The audio driver is point, double-click, and install….
- The LMS_SOL driver must be run in XP Compatability mode
- The Infeon Trusted Platform driver is point, double-click, and install….
- The HECI driver must be run in XP Compatability mode
NOTE: the HECI driver contains an edit to the HECI.inf file which I found on the web. Maybe when I am wide awake I will revisit this post and explain what was done – today, I really don’t feel like documenting that whole thing – but the good news is that it works!
Download
Fiddling With Exchange
- The first thing you need to do, before installing, is go to Add/Remove Programs > Windows Components and addSMTP
and NNTP to IIS. Double-click
Application Server, then double-click Internet Information Services (IIS) to get to the correct menu, - Also, when you’re done, you’ll need to go to Windows Services and set IMAP4 and POP3 to start automatically. They’re disabled by default.
- Passwords: passwords acted funny. I’d swear that my password was happyMAN1023141. I’d typed the numbers with the cap lock off, but
I couldn’t log in unless it was on…. - Logins seem to work with either just a username (eg. “guy”) but sometimes require a complete email address.
- There are numerous warnings about Exchange having compatability issues with this (Server 2003 Enterprise) version of Windows when
the installation begins. They don’t seem to mean anything – it works fine. - For mail to work add an A Record called “mail” for your domain. Then, create an MX Record with a name like “mail.webputzer.com”.
My mail server’s name was actually “dell.webputzer.com” – here’s a failure notice from 10 Minute Mail:
“The following recipient(s) could not be reached:f610300@rmqkr.net on 7/30/2013 7:30 AM
The e-mail account does not exist at the organization this message was sent to. Check the e-mail address, or contact the recipient
directly to find out the correct address.
<dell.webputzer.com #5.1.1 smtp;550 5.1.1 <f610300@rmqkr.net>: Recipient address rejected: User unknown in
virtual alias table. - Once Exchange is set up, you can install Service Pack Two and the included Hotfix.