
Okay, here’s a general guide for getting Exchange Server 2010 up and running on Server 2008 RC2… This page is pretty light reading – sort of like a Reader’s Digest style tech article; it does not get into a lot of complex configuration options, and, it assumes that you know how to do things like edit your hosts file, configure a static IP, etc. – very basic stuff. So, here’s the drill:
- Install your operating system and drivers…..of course!
- Set a static IP (and make sure that IPV6 is enabled – it should be enabled, by default). I doubt many people reading this don’t know how to set a static IP. If you don’t know how to set a static IP, head to Google now (it’s simple).
- Of course, you’ll want to edit your hosts file with the name of your mail server, etc. In other words, if the name of your mail server is “mail.dooda.com”, you need the following in your hosts file:
127.0.0.1 mail.dooda.com
- Make sure that either your firewall is off, or, that you’ve opened the required web server and mail ports.
- Turn on Automatic Updates
- Set Net.TCP Port Sharing service to AUTOMATIC (open the Services manager from the Administrative Tools start link, or, just type “services.msc” from a command prompt).
- Install Filter Pack 1 – you can download it here. Now, if you are ever prompted to install this a second time (which has happened to me, when doing an update) download and install this one.
- Install the Desktop Experience feature.
- Install the Active Directory Domain Services role and, then, run the Active Directory Domain Services Installation Wizard (dcpromo.exe). This can be run from a command line, or, you can click the link which will be present in the Server Manager under the Active Directory summary. The options for this process are very clear, when they require user interaction – and when they don’t, the default values are usually fine. I’m not going to post pictures, nor, go into any lengthy explanation of how this works. Again, if you get stuck with something here (very unlikely) there’s always YouTube, Google. etc.
- Do NOT add active directory users who are going to have Exchange mailboxes from the Active Directory manager. Users are most easily added from the Exchange Management Console. The EMC will add the users to your active directory. If you add users via the Active Directory Manager you’ll end up having to delete them (if they need mailboxes) and, to a certain extent, that whole process can confuse the system. Again, you can add Active Directory users via the Exchange Management Console once it’s installed.
- Install the Application Server role (IIS, etc.) and be aware that this includes many prerequisites for Exchange. To be on the safe side, I include almost everything (with the exception of the Atomic Transaction feature, and, a few others). You will need the IIS 6 compatibility features installed – again, I simply install all of them.
- Do not modify the bindings for your default web site. If you do, the Exchange Management Console may have problems connecting to your server.
- Install Exchange….you should have all of your prerequisites met if you’ve followed this broad outline. The installation routine will do some checking and let you know if anything is missing.
- Basically, that’s it…..! However, you’ll have to some jerking around to start sending and receiving mail globally. So, while your finished installing, Exchange is a bit useless until you configure a few things. But it’s all very easy.
Configuring Exchange – things you need to know
We’ll talk about adding users, and some other things, in just a bit. But, first, please review this general information, and, note the crucial tweaks you’ll need to perform (right away) in order to send and receive mail to and from global sources.
- OWA – your web mail application – runs an a secure port (443) with default SSL certificates (which, of course, generates a warning). The URL will be something like this: https://mail.guysjoint.com/owa/
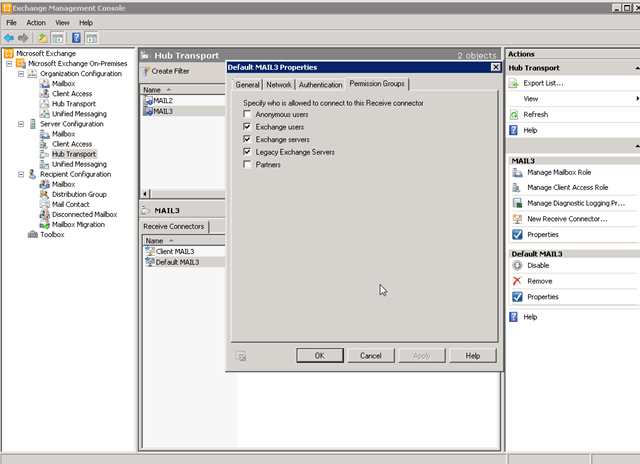
- RECEIVING MAIL – IMPORTANT: You will not be able to receive mail from external sources when Exchange is done. After you’ve added a user (we’ll explain how that’s done, in a moment) you’ll see the following failed message if you try send mail to your server from Gmail, Yahoo, or anywhere else:
The error that the other server returned was:
530 5.7.1 Client was not authenticated
You need to do the following: Go to Exchange Management Console > Server Configuration > Hub Transport > Server Default > Receive Connector > Properties. Now, click on last tab – “Permission Groups”. Check the “Anonymous users” and hit “Apply”. Sounds a lot more complicated than it is – here’s a graphic:
- SENDING MAIL – IMPORTANT: You will not be able to send mail to external email accounts (outside of your domain) when Exchange is done.. You need to do the following: Open up the Exchange Management Console. Double-click on Organization Configuration and click on Hub Transport. Either right-click on the white space or select “New Send Connector” from the right pane…

The following dialog box appears. You can name your new send connector anything (“New Send Connector”, “Bob” – whatever). From the drop-down menu (Intended Use) choose the “Internet” option, as seen below (hit Next when you’re done):
Now you’ll see the dialog box displayed below. Hit the ADD button and the “SMTP Address Space” dialog box will appear. The “Type” will automatically be filled in with SMTP – which is what you want. For Address you need to simply enter an asterisk. You can leave the the Cost option set to “1”, and, I usually tick the option to include sub-folders – that’s at your discretion (see graphic, below – and click Next to continue when you’re done):
Now you’ll see the dialog box, below. If you are using a smart host to route your emails (sometimes required by an ISP), configure it here. Otherwise, check “use domain name system” to route emails (this is typically what you’ll choose). Click Next when you’ve completed this step.

The next dialog box appears (see graphic, below), in which you select the source server. For a single-server installation of Exchange 2010, the source server will be the only one in the list. If you have multiple servers with a hub transport role installed in your organization, you can select a specific server to use. Click Next when done.

Finally, you see the summary page shown below.

After the send connector has been configured, this page will appear. The syntax shown is also the powershell equivalent to what was run. Click Next.

Once the send connector has been created, you’ll need to configure one last item. Right-click on the connector and select “Properties.”

In order to get past some of the more strict spam filters, you need to configure the Fully Qualified Domain Name(FQDN). This is typically the internet-facing address of your email server. Click OK. You’re ready to send email to external domains!

Add An Exchange 2010 Mailbox (video)
Installing SSL Certificates on Exchange 2010 (video)
[videojs mp4=”http://www.webputzer.com/wp-content/uploads/2013/11/Installing.an_.SSL_.Certificate2.mp4″ poster=”http://mysite.com/video-poster.jpg” height=”370″ width=”550″]
Troubleshooting some common problems
Insufficient privileges to view Exchange Organization Configuration
For one reason or another, sometimes you’ll encounter this error (as seen in the graphic, below) – for me, it seemed to be associated with installing Office 2010 and configuring an Exchange email account in Outlook (I’m theorizing, here – it happened just after I’d set up an Exchange account in Outlook on the local server). Even logged in as Administrator, I was locked out of the EMC Organization Configuration GUI. I don’t understand the underlying technical reason that this happened, but the fix is as follows….
Go to Control Panel > Users Accounts > Credential Manager While this is a bit vague, because I performed this fix awhile ago, you should find an entry for a username (associated with your server’s name) that should be Administrator but which is currently the name of an unprivileged user. Just change the name to Administrator and you should be all set…..