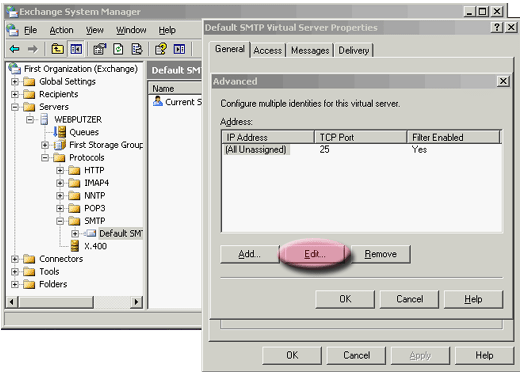
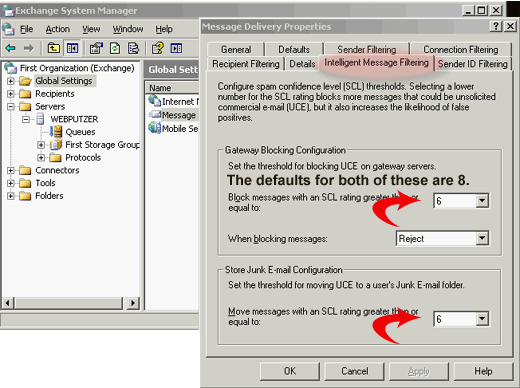
Okay….I read a couple of pages which gave details for enabling this thing, but, none of the directions made any sense relative to my GUI. Why? As usual, I have no idea. Anyway, below are some graphics which show the “way” – on my setup, anyway. This thing requires Service Pack 2 for Exchange and, in fact, is part of the Service Pack:


Instructional Video
After you’ve enabled this you must restart the SMTP server from the services snap-in. Obviously, an admin will need to monitor the results of all of this and do some testing. As seen above, I’ve set the values to “6” and it seems to be working pretty well. Also, as seen in the graphic, you can just choose to “reject” emails, or, take a variety of other actions (which I don’t feel like listing).
From Microsoft (untested)
How to Enable Updates
After you’ve enabled IMF in Exchange System Manager, to enable IMF updates, you must create the ContentFilterState registry entry. To do this, follow these steps
- Click Start, click Run, type regedit, and then click OK.
- Expand the following registry sub key: HKEY_LOCAL_MACHINE\SOFTWARE\Microsoft\Exchange
- In the left pane, click Exchange. Then, right-click in the right pane, point to New, and then click DWORD Value.
- Type ContentFilterState, and then press Enter to name the new registry entry.
- Right-click ContentFilterState, and then click Modify.
- In the Data value box, type 1, and then click OK.
- Quit Registry Editor.
- In the Services snap-in, restart the Simple Mail Transfer Protocol (SMTP) service.
Why aren’t emails ending in the junk email folder?
For emails to be deposited to the junk email folder rather than the inbox you need to make sure that this functionality is enabled at the client mailbox. But before doing this make sure that the Content Filter/IMF is also correctly configured at the Exchange Server. See more details from: How do I configure emails to be deposited to the junk email folder?
If you already verified the Exchange Server settings, then check that the junk email folder is enabled at the client mailbox. This can be done through Outlook Web Access OWA. Other possible methods for enabling the Junk Email folder are available but depend on your Exchange Version as discussed below:
- Exchange 2013 OWA
- Exchange 2010 OWA
- Exchange 2010/2013 Management Shell
- Exchange 2007 OWA
- Exchange 2007 Scripting
- Exchange 2003 OWA
- Exchange 2003 Scripting
Exchange 2013 OWA
-
Open the user mailbox in OWA and click on the Options icon (shown in the upper right corner of the image that follows)

-
From the Options selection on the left select ‘Block or Allow’.

-
You should now see the various Junk E-mail options at the right pane. From here select ‘Automatically filter junk e-mail’
-
Click the Save button at the bottom to save changes.
Exchange 2010 OWA
-
Open the user mailbox in OWA and select Options (shown in the upper right corner of the image that follows)

-
From the Options selection on the left select ‘Block or Allow’.

-
You should now see the various Junk E-mail options at the right pane. From here select ‘Automatically filter junk e-mail’
-
Click the Save button at the bottom to save changes.
Exchange 2010/2013 Management Shell
Setting the Junk Folder enablement through OWA is not efficient when managing multiple mailboxes. Unlike earlier versions, Exchange 2010/2013 includes the Set-MailboxJunkEmailConfiguration cmdlet allowing us to manage the Junk folder enablement status for multiple mailboxes at one go. For details on how to employ this cmdlet please refer to the following article:
Exchange 2003, 2007, 2010, 2013 Junk Email Folder
Exchange 2007 OWA
-
Open OWA and select Options (shown in the upper right corner of the image that follows)

-
From the Options selection on the left select ‘Junk E-Mail’.

-
You should now see the various Junk E-mail options at the right pane. From here select ‘Automatically filter junk e-mail’
-
Click the Save button at the top to save changes.
Exchange 2007 Scripting
Setting the Junk Folder enablement through OWA is not efficient when managing multiple mailboxes. Exchange 2007 does not provide a built-in solution for this. Instead a script is available that can be used to control the enablement status for multiple mailboxes at one go. For details on this script please follow this link:
Glen’s Exchange Dev Blog – Turning on Filter Junk Email in Exchange 2007 via an OWA Script
Exchange 2003 OWA
-
Open OWA and select Options (shown in the lower left corner of the image that follows)

-
Scroll the Options in the right pane and identify the Privacy and Junk E-mail Prevention section.
-
Thick the Filter Junk E-mail checkbox.
-
Click on Save and Close button to save changes.
Exchange 2003 Scripting
Setting the Junk Folder enablement through OWA is not efficient when managing multiple mailboxes. Exchange 2003 does not provide a built-in solution for this. Instead a script is available that can be used to control the enablement status for multiple mailboxes at one go. For details on this script please follow these links:
Evan Dodds – IMF and the Junk E-mail folder in Outlook
Glen’s Exchange Dev Blog – Setting Outlook 2003 Junk Email Options Programmatically
